• Welcome to the BMW Scooter Forums. Member registration disables ads and allows you to post and share. Register Here.

2025 Top Box add-on Side Panels

Reguam

Member
Joined
Jan 4, 2025
Messages
96
Location
Vallejo
Visit site
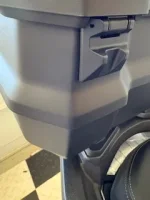
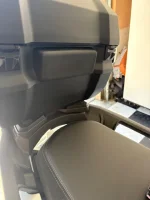
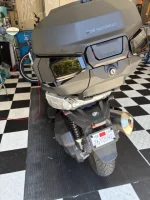
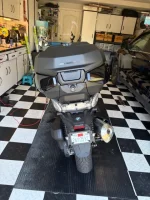
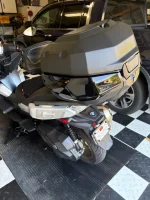
On the 2025 C400GT the top box has the option to switch the flat black side panels for a high gloss set. I cannot figure out how these side panels go on. On one hand if I just hold them in place over the flat black ones it seems to work or at least look right, but there is no way to secure them. Removing anything inside the case is hard to make any sense of. Inside the Glossy Panel there are three protruding anchors but only two inside the case that are in similar locations but the third middle anchor does not have anything. I feel like there is an easy answer that I am not seeing. I cannot find anything on the web or AI because it is so new and paying for those over priced side panels will likely not be popular. I have contacted the store I bought them from in Livermore but they have not responded yet following three requests. Attached is a link to a video with the glossy side panels attached.

▶️ BMW Motorrad Topcase Features & Handling Guide

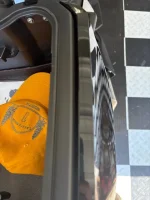
Just found this image. It shows the outside side panel is removed. Maybe it is only #6 is removed an then #5 must be preyed with the trim removal tools.

trunk.webp
 
Last edited:
@Reguam :

It looks to me as if clip #5 slides over the edge of the trim piece, and screw #6 holds the back of the trim piece in place, and probably is first inserted through the inside of the topcase (and then, having gone through the topcase wall, screws into the clip in the trim piece).

Since the diagram shows only one clip at the back of the trim piece, I would guess that the front of the trim piece attaches to some molded-in raised part of the outside of the topcase.

By the way, I have never seen anything that needs prying that is held in place with one of those clips and a screw.

By contrast, the sort of fasteners that need prying apart are those V-tent-like spring-together clips that hold the upper front panel in place. From the owner's manual:

CleanShot 2025-07-08 at 14.49.29@2x.webp

Those are what I'm talking about, and it doesn't look to me as if any of that is involved in your topcase trim pieces. So I'd put away the pry bar for now.

Good luck.
 
Right. I talked to BMW and there is some drilling through the case for the middle anchor. It is still not clear to me where the existing panel detaches from the overall trunk because the molding at the top of the panel runs without any separation across the front of the box as seen in the pictures. The end of the panel goes to the edge of the hinge so most likely scenario for me is it goes over the top. BMW will do it for $75 and that is fine. Thanks. I will update when I learn just so it is posted. BMW (SoSo in Concord) said only seventy of the top boxes have been sold. Not surprised, but is very useful.
 

Attachments

  • Trunk 1.webp
    Trunk 1.webp
    8.8 KB · Views: 6
  • Trunk2.webp
    Trunk2.webp
    9.1 KB · Views: 6
Right. I talked to BMW and there is some drilling through the case for the middle anchor. It is still not clear to me where the existing panel detaches from the overall trunk because the molding at the top of the panel runs without any separation across the front of the box as seen in the pictures. The end of the panel goes to the edge of the hinge so most likely scenario for me is it goes over the top. BMW will do it for $75 and that is fine. Thanks. I will update when I learn just so it is posted. BMW (SoSo in Concord) said only seventy of the top boxes have been sold. Not surprised, but is very useful.
Makes a little more sense now.

Usually, when a hole has to be drilled through a case, there are tiny circles sort of embossed inside the case ... to show you where to drill. This was the, um, case, for instance with two Givi topcases I had on Burgman 650s, and with my current Shad 59X; all of those markings were for adding a passenger backrest piece (or pieces, in the case of Shad), and is probably also true of your new Beemer case for what I believe are its passenger pad(s).

Good of you to keep the community informed when you get all this sorted.
 
Here are some picture of the box with the glossy side panels. I was overthinking the install which is fairly straight forward. I usually need good written instructions and a few backup videos to get through a job, of which I had none. Nothing comes off the case. I posted a picture where the two bolts go and the inside of the box is marked for the drilling A clamp is placed inside the anchor on the inside of the siding, and then the bolt is attached to the anchors. Surprisingly the siding is not flush with the box. There is maybe a .25' GAP that you can look down and see the bolts, but not exposed when the lid is closed. The hardware has to be ordered separately. Classic BMW. I like them. Can't say I love them but, why not. Also got the back rest.
 

Attachments

  • IMG_6875.webp
    IMG_6875.webp
    20.2 KB · Views: 13
  • IMG_6874.webp
    IMG_6874.webp
    35.2 KB · Views: 14
  • IMG_6872.webp
    IMG_6872.webp
    50.6 KB · Views: 14
  • IMG_6871.webp
    IMG_6871.webp
    45.4 KB · Views: 14
  • IMG_6867.webp
    IMG_6867.webp
    63.6 KB · Views: 14
  • IMG_6868.webp
    IMG_6868.webp
    56 KB · Views: 14
  • IMG_6876.webp
    IMG_6876.webp
    34 KB · Views: 14
Hello everyone. Thanks for the detailed post as it helped my dealer install this case in Minnesota. My wife took her first ride as a passenger and is already complaining that the backrest pad is uncomfortable. Any thoughts or tips? Thanks!
 
Back
Top