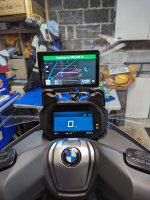
Are there any instructions on how to remove the handlebar and other covers? I also have a Garmin XT. Just bought the bike today ordered the mount and connector after reading these posts and don't want to mess anything up. Did a quick search but did not find anything.
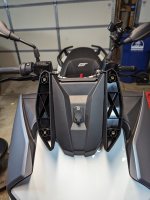
There are four screws holding the first half of the handlebar cover in place. You can see one on each side of the cover, sort of on the front (of the bike) side, and one each
underneath that cover, over by the ends (i.e., in the vicinity of the brake reservoirs). Hint: almost all of the bodywork fasteners are Torx 25 screws (exceptions that come to mind are the springy clips that work in conjunction with T25 screws on most of the larger bodywork pieces, the four screws that hold the windscreen in place (which are a slightly larger T size), and two plastic push-pins down by the underseat storage compartment).
I had been so used to removing the handlebar cover from a couple of Burgman 650s that I owned that it didn't require much thought, removing the handlebar cover from the C 400 GT. It's pretty much the same thing, and fairly intuitive.
What you really need is the shop manual, which BMW doesn't make available in any form for the laity (and on CD-ROM, I believe, for their techs). See this thread that I started over a year ago, for instance:
If anyone's interested, I received a thumb drive with the C 400 GT shop manual a couple of days ago. This is the one I bought, via eBay: https://www.ebay.com/itm/133967057090 (If the link becomes obsolete at some point, the heading is "BMW C 400 GT K08 WORKSHOP C400GT SERVICE MANUAL ON USB,"...

www.bmw-scooters.com
The not-so-great news is that this PDF manual is not organized all that well, in terms of bodywork. The shop manual for the Burgman, for instance, had a full chapter on bodywork removal, with a nice flow chart describing which piece needs to come off before what other piece can be removed. By contrast, the C 400 manual lists bodywork removal only as each piece relates to doing some non-bodywork task, i.e., getting to an actual functional part of the bike. Thus, you have to do a fair amount of searching to get to the actual descriptive steps to remove a given bodywork piece.
Nevertheless, I managed to work through all that last year, when adding electrical farkles to my first C 400 GT. You can look through my gallery --
https://billanddot.com/C400GT/ -- to see that I did, in fact, remove most of the front and rear bodywork at one time or another.
Good luck with your project.