• Welcome to the BMW Scooter Forums. Member registration disables ads and allows you to post and share. Register Here.

Updating maintenance on a 2013 BMW C 650 GT

NOTES ON CALIPER REMOVAL ....

DUH moment for me. Just remove the front brake pad pin and get the pads out of the way. There is plenty of room to slide the caliper off the wheel. I was glad to have them off to pull the caliper pins out of their rubber sleeves. The sleeves had ZERO grease inside. Not a dab. The chamber was barren. It was a famine of grease the likes of which the Pharoahs of scooters had not seen in their lifetimes.

With new grease and pads, the front brakes were way more responsive. I get the impression the previous owner just rode and rode and rode and ... didn't do jack for maintenance. He changed the oil regularly. But the air filter and brake fluid were the dirtiest I've seen. The battery died days after I got the bike home. Guess it's a positive testimony about the BMW C 650 GT ... even when you ignore it, it just keeps rolling. "Roller" is the German word for scooter, btw ... Der Roller ... Ich habe einen BMW Roller.

Not sure about the rear caliper. It doesn't slide out of the wheel when the brake pads are dropped. Looks like the rear wheel has to come off and that would provide total access to the caliper. Luckily, this is the easiest rear wheel to remove I've ever seen on a bike.

Meanwhile, for lubricating the rear rubber sleeves, I did a bit of jerryrigging ... held up the lip of the rubber sleeve with tweezers and pushed dabs of SylGlide inside the sleeve, patiently working in the lubricant until the pin moved freely. Also noticed an improvement in rear brake response but it wasn't as dramatic as the front.

UPDATE ON REAR CALIPER: Taking off the rear wheel is easy. Remove five T-45 hex bolts and slide the wheel out of the way. The service manual says remove the muffler ("silencer") but that's not necessary; plenty of room by sliding the wheel toward the muffler. Remove the brake pad pin, the brake pads and caliper bolts and the caliper is free. Like the front rubber sleeves, my rear didn't have a touch of grease inside. I inserted generous portions of SylGlide in each sleeve and the caliper pins moved easily again. While I was down there I noticed my parking brake pads are wisps of their former selves, so I'll order those and replace.

By the way, with all this work, I haven't met a Torx bolt that didn't fit the six bits I bought to work on this bike ... T-25, T-27, T-30 (most common; also need a T-handle screwdriver version of T-30, which is required to unscrew one particular bolt in the CVT case for a belt change), T-45 (rear axle bolts), T-50 and T-55.
 
Last edited:

Very cool writeup. I'm a long way from needing to do this kind of work, but that day will come.

Rear tire should be easy enough. Take the wheel off and bring it to the dealer. Probably better with this bike due to the tpms sensor in the wheel and the potential to screw that up by people that dont know what they are doing. When I had the RT, I ended up buying the tires from the dealer, their price wasnt far off what I was seeing online at the time. I don't put enough miles on it in a year that I would want to invest in all the gear to do tire changes myself.
 
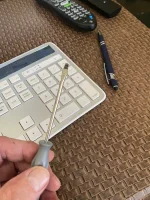
Posting a photo for Mike in San Jose because DM won't let include photos for whatever reason. This is the screwdriver I used for the coil connector on the plugs.

IMG_5578.webp
 
NOTES ON SPARK PLUGS AND COOLANT ...

I keep notes after a maintenance job to quickly get myself up to speed next time I do the work, since some of this maintenance can be a year or two apart, like coolant and plugs. Here's what I wrote about plugs and coolant, hope it's helpful for someone ....

SPARK PLUGS
Installed new NGK plugs March 2021 at 15,100 miles.
NGK LMAR8D-J
TORQUE spark plug: 12 Nm (9 ft. lbs.)
NOTES: Drop the radiator by removing screw clips on top sides and bottom center of radiator and two T30 bolts just under radiator cap. Loosen the overflow tank and lift up the radiator out of its holders (top sides) and rest it on something solid. For spark plugs, the 14 mm. Prius spark plug socket is a perfect fit. Apply gentle pressure behind top of coils with 10” socket extension to push them gently forward and out. Remove coil connectors by pushing the front clip open and pushing up on lip of connector with tiny flat blade screwdriver while pulling up on the wires – be gentle It will come up and out. This is not a system like many others where you squeeze it to release it; has to be pushed and pulled out. Old spark plugs were dark at gap point but had lots of life left in them – BMW’s recommendation of new ones at 24,000 miles is solid.

COOLANT
Installed new BMW OEM coolant March 2021 at 15,100 miles.
Coolant capacity listed as 1.5 liters in the service manual (40% of a gallon)
NOTES: Drain the coolant pump and torque to 10 Nm (7.3 ft. lbs.). Drain the overflow tank, loosening the right bolt to tilt the tank down and pour every drop out. Drain the radiator. Exactly 1.5 liters came out, which is BMW’s listed capacity. Most of that amount poured directly back into the radiator cap and overflow tank. When both were full, ran the engine a few minutes to get coolant into the system and then added the rest of the 1.5 liters.
Delray, I think I noticed a while ago that you had disposed of your 650. However, you may be able to help me with a query - I have not had any trouble with cooling or spark plugs but before I undertake a long ride well away from any BMW mechanics, I need to know how to access the radiator and the spark plug. In this post of yours you mention how to drop the radiator - but to do that, it looks as if some fairings will have to be removed first - which ones? Is there a guide on how to remove ALL covers for the c650gt? (I have not been able to find one yet. There is a Youtube video but it is in Korean!
 
"Is there a guide on how to remove ALL covers for the c650gt?"

I have seen those Korean videos. They're helpful, at least visually. Also fyi ... I sold two GT's but currently ride a 2013 model. LOVE. THIS. BIKE.

To your question: yes, there is an excellent guide for removing tupperware, the BMW Service and Repair Manual. It's only on DVD and only runs on Windows (annoying for an Apple guy like me). Excellent resource and the price is right ....


General tip for GT farings: It all starts with the gas cap filler flap and work downhill from there (pinch in to get the flap off then figure out the screws and tabs for everything else).
 
Last edited:
"Is there a guide on how to remove ALL covers for the c650gt?"

I have seen those Korean videos. They're helpful, at least visually. Also fyi ... I sold two GT's but currently ride a 2013 model. LOVE. THIS. BIKE.

To your question: yes, there is an excellent guide for removing tupperware, the BMW Service and Repair Manual. It's only on DVD and only runs on Windows (annoying for an Apple guy like me). Excellent resource and the price is right ....


General tip for GT farings: It all starts with the gas cap filler flap and work downhill from there (pinch in to get the flap off then figure out the screws and tabs for everything else).
Thanks Delray. Ordered one this morning!
 
Just re-reading this very helpful piece from Delray. Confession: I did something as dumb as what Delray did with the variator holder - I tried and tried to get the CVT cover off (to change the belt etc) and even after taking ALL the bolts out, it would not budge! Someone on one of our forums here suggested maybe I had missed a bolt. When I checked again, found I had missed 2! That made it so much easier. But worse was to come. When I had the CVT, belt, etc, all done, reassembled, it was time to start the bike up, give it a run. Nothing. What had I done? Battery OK, key working normally, racked my brains. I guess I stood beside that bike in my garage, trying
for half an hour. Nothing, not even the slightest movement in the starter.
So finally, I drove my car to the local dealer and asked. Boy, was that hard to do. We went through the whole process. Then he said, just come over here - to where there was a C650GT parked, by some miracle - he grabbed the handlebars and fired it up. When I was checking mine to start, had I held the brake lever in? NO I HAD NOT! The humiliation! But also - the RELIEF! Not often such a terrible problem has such a simple fix ...

Today, another simple problem - perhaps. The coolant level (below the RHS footplate) is OK. But when I open the radiator cap, coolant is well down. Should it be topped up at the radiator cap, as well as kept in the right range at the observation slot?
 
I picked up the BMW brace tool today (photo) at BMW Motorcycles of Fort Lauderdale and it fits perfectly. That includes the larger-than-33mm nut on the left variator. So clearly it was engineered that way. The problem may have been my assumption that the left nut should be the same size as the right nut. Isn't that the way God designed nuts? ;o)

I know the Sharpie line on the variator face has to do with smoothness and/or positioning, I'm just not sure what I'm looking for, and the Service Manual and helpful pdf, which I downloaded awhile ago, don't expound on that. I eyeball the belt for smoothness without the cover, as I did with Silver Wings (the system here is very comparable to the Wing). Also think lining up everything where it was before is always a good idea. Machines probably like that.

By the way, the Silver Wing brace tool is a weird, three-legged contraption that screws into the frame. The BMW tool fits perfectly just by dropping it in place.

View attachment 3035
So i am not the only one who bought that kind of tools for the variator.
My bike has now 15K on it n this fall the belt will get changed for sure along
with other things that the 12k maintenance will be done. Wonder why
they did NOT make BOTH of those nuts the same size. I hope that the tool
kit i bought has BOTH sizes.
 
. Je me demande pourquoi
they did NOT make BOTH of those nuts the same size. I hope that the tool
They're the same size (and the same part number) in the manufacturer's spare parts catalog, and I've never seen a C600 or C650 with two different-sized nuts on the CVT.

I rather think that the left (clutch) nut on the Delray was not the original one.
 
Today, another simple problem - perhaps. The coolant level (below the RHS footplate) is OK. But when I open the radiator cap, coolant is well down. Should it be topped up at the radiator cap, as well as kept in the right range at the observation slot?
Yes, the coolant level must be flush with the neck on which the radiator cap seal rests.
 
They're the same size (and the same part number) in the manufacturer's spare parts catalog, and I've never seen a C600 or C650 with two different-sized nuts on the CVT.

I rather think that the left (clutch) nut on the Delray was not the original one.
Those two different nut sizes is a mystery. On my own 2018 650GT they are definitely different, and the special tool is in fact a 34mm (measured with a micrometer). And to put the necessary torque on those nuts, I do not believe it could be done without the correct sized tool. Just another reason to get the special tool, I found it just made the whole job easy.
 
Mine are 34mm for both pulleys (variator and clutch).

Some users deploy the side stand (which locks the rear wheel disc) to secure the axle. This seems to be powerful enough to tighten/loosen the nut to the right torque.

I've never tried it, as I have special tools.

In Europe, we have a small company that manufactures a range of tools for complete transmission maintenance. It's really well made and perfectly adapted to our C600/650 CVTs.

I don't know if you can find it. Maybe with Amazon: https://www.amazon.fr/Easyboost-Variateur-Embrayage-Correcteur-Indispensables/dp/B08VZLZZ1N/
 
Back
Top