steve l
Member
See also: C600, C650GT Technical / Water Pump 01 - Access
Repair options;
(1) BMW sell the RHS engine cover complete with water pump for £160, I managed to find a NOS (new old stock) one on Ebay for £100.
(2) Import a repair kit from Italy, total cost £70. This includes the impeller shaft that may be required in some cases.
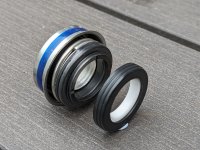
(3) Fit new seals, total cast around £25, the seals are not available from BMW. For detailed info on the seals required, see photos below.
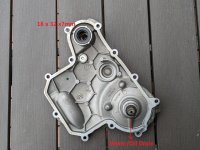
I decided to fit a new RHS engine cover and then replace the seals in the old one to keep as a spare.
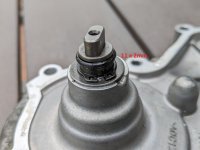
The large alloy timing plug could not be removed using the 10mm hex socket provided and it is not supplied with the new engine cover. I ended up cutting a slot in the plug and crushing the plug in my bench vice to release it. A Honda CG125 valve cover (M36 x 1.5mm) was used as a replacement. See photos below.
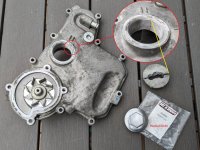
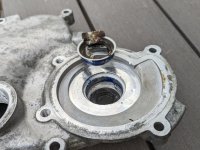
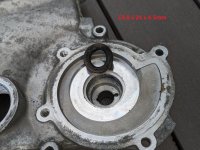
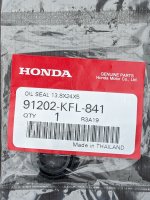
The water pump mechanical seal required heating to soften the blue sealant on the outside of the steel spring cup, this damaged the oil seal behind it. The oil seal is a none standard size (13.8 x 24 x 4.5mm). I used a Honda C50 kickstart shaft seal (13.8 x 24 x 5mm) to replace it, as sufficient space is available for the additional height.
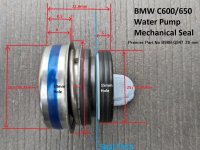
A 28mm Premier Seals (Part No B98B:G847) mechanical seal was sourced from www.happybikes.co.uk for the water seal. I have been unable to find any other suppliers. I purchased a 50mm length of alloy tube to drift in the new seal as all the sockets I had fouled the seal spring, that I did not want to remove.
A You Tube video of a similar seal replacement can be seen at:
Alan from happy bikes ([email protected]) gives the following advice when fitting seals;
1. When fitting the metal cup it's best to use a hydraulic press. You can also tap the cup home by using a 24 or 27mm socket and short extension bar. Apply a little silicon sealant to the outside edge of the cup, especially if the casting has been scratched removing the old seal.
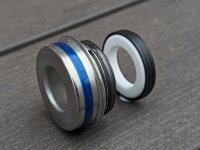
2. Apply a small amount of silicon sealant into the impeller before fitting the rubber and ceramic polo seal. This must be done if the impeller shows any sign of corrosion. The side of the polo with the black or red stripe goes against the rubber seal. If no stripe is marked then the dull side should go against the rubber.
3. The pump will be slightly stiff when assembled, this is normal, don't oil the seal and don't be tempted to start the engine with a dry water pump. The mechanical seal is lubricated with water so the white ceramic will overheat and crack is seconds.
For hints on fitting we have a few movies on YouTube. Look up- "Honda NS400 water pump service" "Honda Deauville NT650V leaking water pump fix." "Honda ST1100 water pump service"
Repair options;
(1) BMW sell the RHS engine cover complete with water pump for £160, I managed to find a NOS (new old stock) one on Ebay for £100.
(2) Import a repair kit from Italy, total cost £70. This includes the impeller shaft that may be required in some cases.
(3) Fit new seals, total cast around £25, the seals are not available from BMW. For detailed info on the seals required, see photos below.
I decided to fit a new RHS engine cover and then replace the seals in the old one to keep as a spare.
The large alloy timing plug could not be removed using the 10mm hex socket provided and it is not supplied with the new engine cover. I ended up cutting a slot in the plug and crushing the plug in my bench vice to release it. A Honda CG125 valve cover (M36 x 1.5mm) was used as a replacement. See photos below.
The water pump mechanical seal required heating to soften the blue sealant on the outside of the steel spring cup, this damaged the oil seal behind it. The oil seal is a none standard size (13.8 x 24 x 4.5mm). I used a Honda C50 kickstart shaft seal (13.8 x 24 x 5mm) to replace it, as sufficient space is available for the additional height.
A 28mm Premier Seals (Part No B98B:G847) mechanical seal was sourced from www.happybikes.co.uk for the water seal. I have been unable to find any other suppliers. I purchased a 50mm length of alloy tube to drift in the new seal as all the sockets I had fouled the seal spring, that I did not want to remove.
A You Tube video of a similar seal replacement can be seen at:
Alan from happy bikes ([email protected]) gives the following advice when fitting seals;
1. When fitting the metal cup it's best to use a hydraulic press. You can also tap the cup home by using a 24 or 27mm socket and short extension bar. Apply a little silicon sealant to the outside edge of the cup, especially if the casting has been scratched removing the old seal.
2. Apply a small amount of silicon sealant into the impeller before fitting the rubber and ceramic polo seal. This must be done if the impeller shows any sign of corrosion. The side of the polo with the black or red stripe goes against the rubber seal. If no stripe is marked then the dull side should go against the rubber.
3. The pump will be slightly stiff when assembled, this is normal, don't oil the seal and don't be tempted to start the engine with a dry water pump. The mechanical seal is lubricated with water so the white ceramic will overheat and crack is seconds.
For hints on fitting we have a few movies on YouTube. Look up- "Honda NS400 water pump service" "Honda Deauville NT650V leaking water pump fix." "Honda ST1100 water pump service"
Attachments
-
 C01 RHS Cover Inner.jpg771.5 KB · Views: 8
 -
 C02 RHS Cover Outer.jpg788.3 KB · Views: 8
 -
 C03 Impeller Drive.jpg342.2 KB · Views: 8
 -
 C04 Water Seal Old.jpg504.4 KB · Views: 7
 -
 C05 Oil Seal Old.jpg571.7 KB · Views: 6
 -
 C06 Oil Seal New.jpg363.9 KB · Views: 7
 -
 C07 Water Seal Dimensions.jpg483.2 KB · Views: 8
 -
 C08 Water Seal New L.jpg538.2 KB · Views: 7
 -
 C09 Water Seal New R.jpg849.7 KB · Views: 7
 -
 C10 Water Seal Completed.jpg321.4 KB · Views: 7
Last edited: